Friday, July 31, 2009

The Greeting Farm Blog Hop

Hi Everyone...
Ready for the weekend?? I am... I have 3 days off in addition to my weekend.. Woo Hoo! Actually I was forced to take off because of my daughter's kindergarten school schedule. Oh well- maybe I'll have some time for crafting?
I've been a little MIA recently. Got busy getting the Island Scrapbooking blog ready for The Greeting Farm Blog Hop! If you haven't checked it out yet, go to the Club Anya or Splendid Stamping with the Greetings Farm blogs for more details. They will be publishing a list of blogs that are participating so you can "hop" and check out everyone's creations. Its a great way to get new ideas. Don't forget to check out the Island Scrapbooking blog to see what we all came up with!
Here's my contribution to the blog hop... I had something totally different in mind when I started working on my card, but it didn't work out (don't even ask- its that bad), that I had to come up with a new card... and fast! Yes, I procrastinated because I got side tracked and worked on a non-Greeting Farm project that I will post soon. So to make a long story short, I stayed up till 2am last night and worked on the finishing touches till now....
As I stared at all of my TGF stamps, I was drawing a blank... sometimes the images you have just don't fit your idea.... so scrap the idea right? I decided to use the Rock the Farm set because TGF uses the farmer girl as their logo and they are the Greeting "Farm" right? So I incorporated the farm animals into the design as well.
The other theme I wanted to incorporate was the "small world" concept. My sister lives in Italy, born and raised in Hawaii, and we are Japanese, so she's very into the international theme. Now that TGF has come out with some international Anya and Ian designs, I thought this was the way to go- reminds me of her. Luckily, Kelli was nice enough to stamp a Scottie Ian and Navajo Anya for me, otherwise my concept might not have worked. Thank you Kelli! I really wanted to incorporate the world/globe in my card, so I printed a clip art from the internet.
Now for the funny part... I decided to make this a pop up card.... see how the world and all the Anyas/Ians pop up off the card? Well, when you close the card, the Hula Anya's head popped out from the side of the card! I had to perform surgery and attach the red border strip onto the card so it extended it. Yikes!
This actually gave me more room for my title, but the card ended up huge! It reminds me of a small portfolio. Oh well. Need to keep that in mind next time I work on a pop up card!
Overall, this project turned out to be very stressful but I like the results. I think I would like it more if the card were smaller.
So my daughter, who loves Anya stamps by the way, decided she wanted to participate in the blog hop too! Here's her contribution. Daddy had built this house for her favorite stuffed bunny (aka "Daba") which we painted/decorated together. That's balloons and a rainbow on the roof, Wubzy carpeting on the top floor and a Daba carpet with "I Love You" painted on the bottom floor. When I came home from work today, she had the house decorated with all her Anyas. Guess she's gonna be a crafter just like Mommy!

Tuesday, July 28, 2009

Stampin Up Tip

I don't know about you, but I love Stampin Up stamps... I just wish they were available in clear or as a cling type instead of wood mounted. I recently bought the 5th Avenue Floral set (woo hoo!) and was ready to mount them on the wood, when I thought to myself... why can't I mount it on a cling? So I tried it out on the stamp I liked least and guess what... it worked! All you Stampin Up experts out there probably already thought of this, but I haven't seen it out there in blog land yet, so thought I'd share it with all of you.
All I did was peel off the paper from the stamp (Just love how these stamps come already cut!), stick it onto some EZ Mount, and cut EZ mount to fit the stamp. Its now ready to be used with your acrylic blocks! Yahoo! Now the only question is... what to do with all those extra wood blocks?

Monday, July 27, 2009

Another RAK from Debi

My new friend Debi seriously needs to start her own blog! She recently picked up these cute stamps by Two Scoops Rice. We are meant to be friends because I bought this same set! I haven't used mine yet though... Inside this cute card she stamped some of her All That Scraps and Pink Cat Studio images for me so I could test them out to see if I wanted to buy them too. So thoughtful yah? Can't wait for our next play date- Wednesday right?

Sunday, July 26, 2009

Bloggy Friend Award...

Enjoli of Stamping Under the Sun just gave me this blog award! She's so sweet to think of me and my blog. I just love her creations- her color combinations are really sweet and girlie. So since this award is about friendship... here's some bloggers I'd like to give it to... They regularly give me nice comments on my projects, which I am thankful for. Linda- Simple and Sassy Creations Kyoko (Linda's BFF)- Cards and Tags Mania Laura- bytkg Les- Leslie's Photos The Girls at Island Scrapbooking- Island Scrapbooking Kelli- Wink and a Smile Eunice- A Star for Chiemi Denise- Denise loves stamps And some new visitors... Michelle- Mushi's Creative Inspiration Brenda- Sweet as a Gumdrop Carol- Extreme Cards and Paper Crafts Michele- My Simple Crafts Joni- Crafty Hula Hands Joy- A Place To Be Me I know a lot of you guys probably already got this award already, but thought I'd pass it on anyway. Have a great week!

Friday, July 24, 2009

2-4-6-8...

So the reason I made this card was because I needed to practice making this double slider card in preparation for my upcoming class. I had to make sure I remembered how to make it! I decided to FINALLY use my Cheer Anya stamp. Don't ask me why I bought her... I was never a cheerleader, nor do I have any connections with any. I just think she's pretty darn cute. Maybe its because I like the movie "Bring It On".. yes, I admit it. It's pretty hilarious.
Anyway, back to the card... Since we got some complaints about school colors that I used to make the samples at Island Scrapbooking, I decided to pick colors that were not associated with any school, yet fit Anya's personality- pink and black right? I don't think any school has these as their colors.
So, a looooooong time ago, I saw someone had made a tutorial on using embroidery floss for her pom poms. I'm sorry, I can't recall what blog it was from, but if anyone knows, please let me know so I can give credit to her cute idea. Here's a better look...
Don't laugh at my cheer...
I tried to remember cheers from my high school days, but my mind was blank and all I could come up with was the "bus driver cheer". hee hee. Do kids still do that?
Who do I appreciate? You of course! Thanks for visiting my blog and leaving comments. Yay... its the weekend! Have a good one!
Supplies used:
Cheer Anya- The Greeting Farm
Number dies- Sizzix
Cardstock- Bazzil
Embroidery Floss
Ribbon
Markers- Copics

Thursday, July 23, 2009

Washi Flower Pop Up- Attempt #3

Hi Everyone!
Thanks for all the nice comments. I really do appreciate them! Here's my last flower pop up... I finally figured it out... Thanks to Carol from Extremecards.blogspot.com for her help! The problem with the red card is that the washi is too lightweight. To solve this issue, I mounted the washi paper onto cardstock before attaching them all together. It makes the card bulky though, but I'm happy with the result when you open it up.
Supplies used:
Washi paper- Hanko
Dhalia die- Spellbinders
Leaf die- Sizzix
Stickles
Thank you stamp- Hero Arts
Cardstock- Bazzil
Thanks for stopping by! For those of you who live in Hilo, I'll be teaching a class on this and the tri-shutter card at Island Scrapbooking next month. If you want to learn how to make this card on your own- Carol has a tutorial on her blog (see above or sidebar for link to her blog).

Wednesday, July 22, 2009

Bear and Butterflies

I just love this Hero Arts Bear stamp! I don't know why I bought him, I guess I just thought he was cute. I've been meaning to make a Thank you card for the past few weeks for my hairdresser. She was so nice to give my husband A LOT of her old obon towels that she's collected over the years. I had told her that he uses them a lot when he plays Taiko and that there are a lot of kids in the group that don't have. This was the perfect opportunity to use my new stamp.
I also bought this Martha Stewart punch recently and couldn't wait to use it. When I first saw it, I really didn't think much of it, but the more I looked at it, I realized I could use the smaller butterflies and make a whole bunch of them. I just love how they accent the card without stealing the show.
Supplies used:
DP- Bo Bunny, SU
Bear and Thanks stamps- Hero Arts
Butterfly punch- Martha Stewart
Circle and scallop circle die- Spellbinders

Tuesday, July 21, 2009

Washi Flower Pop Up- Attempt #2

If you follow my blog, you know that I often make several versions of the same card. Guess I like to practice until I understand how to do it. So, here's my 2nd attempt at this flower pop up card. This time, instead of using the cricut cut file for the flowers, I used the Dhalia Spellbinders die to cut the flowers. The only trouble I ran into on the mechanical side is that the washi doesn't slide open as well as the last card I made. I don't know if its the shape of the flower or the fact that the washi is more flimsy than the cardstock. Need to experiment more on this! In the meantime, here's how the card came out...
Here's the inside.... I still don't know if I really like the busy washi paper as the flower.
Here's a close up so you can see how much it pops up.
Supplies used:
Dhalia die- Spellbinders
Washi- Hanko designs
Leaf die- Spellbinders
Crystals- Crystal Accents
Thank you stamp- Hero Arts
Cardstock- Bazzil

Monday, July 20, 2009

Stylish Kitty

I've been neglecting my Hello Kitty stuff lately. Too much new things to play with!
So, ever since I saw Cheryl create a Hello Kitty card using this houndsooth (spell check please) stamp I was on a mission to get one. At first I thought she used printed paper, but never did find it. I finally realized it was a stamp- (duh!) and always kept it in the back of my mind. Island Scrapbooking did a special order for me and I picked it up a couple of weeks ago. I finally got to play with it the other night and couldn't resist using Cheryl's idea of using HK with the design. She has a great eye for design! Anyway, I used a different HK die, but I think I used the same color scheme. Red works so well with black and white, I couldn't resist. Thanks Cheryl for sharing your great ideas!
Supplies used:
HK die- Sizzix
Birthday Girl and Houndsooth stamp- Hero Arts Crystals- Crystal Accents, Hero Arts
Stickles
Oval dies- Spellbinders
I'm still trying to get over Relay for Life! Maybe I'll be less tired tomorrow. Better go sleep already!

Face Painting Adventures

Every year my department does face painting as a fundraiser at the American Cancer Society's Relay for Life in Hilo. I was this year's co-captain, so I was in charge of face painting. Luckily we were able to get some pretty artistic volunteers to help us this year! Thank you to Sara, Kami, Jodie, Teri, and Wendi for spending most of your night helping us raise money for Relay.
Kami's first special request...
A Jamba Juice employee asked for the JJ logo on her cheek... I think Sara did a great job!
Another custom design by Kami...
Look- it even breathes fire!
Finally, I couldn't not have a Hello Kitty design available, right? I decided to make my own "stamp" by cutting a foamie using my HK Sizzlits. It didn't cut all the way through since I used a thick foamie, so I ended up cutting by hand following the cut marks. Then I mounted it on another piece of foam and voila! This was very popular with the older girls.
We also got some unusual requests... a moustache, a unibrow, and a blue face! I guess we'll paint anything for a $1!

Speechless..

Hi Everyone...
Got a nice post from Carol of Extreme Cards and Papercrafting that she had a blog award for me, so I went to check out her blog and boy was I floored that she would give me a blog award for inspiring her when her blog shows her level of paper crafting is way beyond what I'll ever hope to be. Thanks Carol, you are too nice.
So now its my turn to pass this on to those that inspire me... I know I just sent out a blog award recently to a bunch of you out there... here's a few more that I visit regularly...
The Girls @ Island Scrapbooking- Island Scrapbooking
Here's a non-crafting blog that I like to visit too..
Thanks again Carol and the rest of you out there who share all your great ideas!

Wednesday, July 15, 2009

Copy Cat

Yes, I'm a copy cat. I like to borrow ideas and make them my own.... I think we all do that, right? Anyway, I just love learning from all you other bloggers out there... I recently saw a tri-shutter card and looked up the directions... found them at the Craftiblog click here...
Anyway, here's my version... had to use TGF stamps that I never used yet. These are part of the Wild Sprouts line of TGF. The sentiment is part of my Friends Hero Arts set. The Butterfly and roses are from Big Island Packaging (sorry, no company was listed). I like how the girl's head covers most of the words on the sentiment except for "friend".
Here's what it looks like when its open.
I also saw this card on Eunice's blog. She has such great ideas! You need the cricut, george cartridge and design studio in order to cut the flower from the cut file. This is my sample card- not that nice, but useful to look at the technique. Much easier than it looks!
Supplies:
Cricut- George Cartridge, design studio software
Stickles
Vine die- Sizzix
Cardstock- Bazzil.

Monday, July 13, 2009

Pop Up Scrapbook Card

Hi All! Hope your week is starting out well. Worked on this card over the weekend. I had told Tracy about my idea and was dying to show it to her after I finished it last night. Since I wanted it to be a surprise, I didn't want to post it till I could show it to her in person. This is actually Teri's Pop Up Scrapbook that I scaled down to card size. Instead of using 12x12 paper, I used 8x8, so each square came out to a 4x4 size.
I didn't really intend to give this card to anyone, but since the girls at Island Scrapbooking have become my friends, I thought I'd give this to all of them...
Here's the first "page"... Caption says "Meeting new friends"
"Page" 2... "Who share"
"Page" 3.. "The same interests"
Finally- the last page... "as you!"
See, she's now with all of her new friends!
In case you are wondering, yes, I stamped the lanterns, stickled them, and then cut each one out. I then strung them using a lei needle. I poked holes in each page and knotted them so that the lanterns would stay in that section.
It actually didn't take as much time as I thought it would. Waiting for the stickles to dry took the longest.
Don't know if you can tell, but each doll actually pops out from the background. It reminds me of a little doll house. I guess that's why I decided to use the Japanese doll set by Hero Arts.
Supplies used:
Japanese girls- Hero Arts
Markers- Copics
Washi paper- Hanko designs
Cardstock- Bazzil
Sakura punch
Crystals- Hero Arts
Stickles
Gold cord
Ribbon
Dew Drops
Have a great week!

Saturday, July 11, 2009

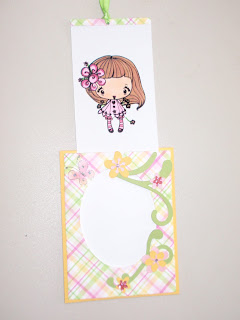
Magic Card Class

Just wanted to share some of the cards from today's Magic Card class. We all had the same paper kit but the girls in the class chose different stamps to work with. All of them came out so cute!
Here's the card when its closed.....
Abracadabra!
Here's Amy's card using the Greeting Farm Dhalia stamp..
Here's Belinda's card using the H&G Sing stamp...
Here's Susan's card using my favorite- Snuggle stamp.
And finally, here's my card featuring either Hope or Grace... not sure which is which!
These gals were so talented that eventually the students didn't even need me there!
Sorry to my first class- I forgot to bring my camera! I know I'm so junk. I'll try to remember next time so I can feature all of our cards.

Magic Card (adapted) Tutorial

As requested, here's the tutorial of my version of the Magic Card (adapted by me). It was adapted from the instructions posted on Split Coast Stampers. I had problems following their instructions, so I made some adjustments and it works better for me.. hope it helps you!
Supplies:
One 4 1/4” by 5 1/2” cardstock– card base (you can also replace with an A2 card so it will open)
· One 8 1/2” x 10 1/2” for cover (if using patterned paper cut 8 1/2” side facing up; 10 1/2” side should be facing sideways)
· One 3 1/2” x 5 1/2” white cardstock– for colored image.
· One 4” x 5 1/4” piece of white cardstock (backing for non-colored picture). Note- I've found that I've had to trim this down a little so you may have to too.
· 1 sheet of Acetate (~ 4 1/2 “ x 6 1/2”- allow room for trimming).
· One 1/2” x 3” of cardstock– for top of image.
· Ribbon
· Paper flowers, flourishes, crystals, Stickles (all optional) Tools:
· Stamp– The Greeting Farm images are recommended because of their size. Try to use line stamps (not those that are filled in).
· Stamp– Greeting (optional)
· Paper cutter
· Score blade or bone folder
· Markers or color pencils
· Double stick tape
· Scissors
· Staz On black in pad
· Spellbinders Oval dies- you can try using different Spellbinders shapes.
· Hole punch (1/8”)
· Circle Punch
· Sizzix Big Shot
Instructions: 1. Score your 8 1/2” x 10 1/2” cardstock horizontally at 5 1/4”.
2. Reposition cardstock vertically and score it at 4 1/4”. You should now have 4 panels.
3. Change to a cutting blade and cut out upper left panel.
4. Cut off 1/4” off the long side of the right panels.
5. Cut on score line between the right side panels leaving 1/2” on each side. (hint: If you turn the paper horizontally, start cut at 1/2” and end at 3 1/2”. Hope you can see where I cut on the score line.
Put piece aside for now and work on stamped image.
6. Using 3 1/2” x 5 1/2” of white cardstock, stamp image ensuring at least 1/4” on each side and at least 1/2” from bottom. Try to center image as much as possible.
7. Color image as desired.
Note: You could stamp a sentiment here if you want to. I normally wait till the card is almost done so I can see if I have enough room for the words.
8. Lay acetate over image and try to center it– leaving space to trim acetate.. Note: if you are a good stamper, you could probably use a smaller piece of acetate, but I leave room so I can trim.
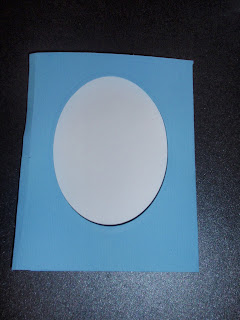
9. Stamp image using Staz On black ink. Don't laugh at my stamping... I didn't re-do it because I just wanted to make this tutorial! Normally, I would have re-done it. I put it on blue so you could see that it was stamped on the acetate.
10. Adjust acetate so that it lines up perfectly with colored image. Using double stick tape, adhere acetate to the top of the image so that it lines up perfectly.
Its hard to see but this photo shows the double stick tape at the very top of the cardstock.
I start lining it up from the bottom of the image and work your way up so that you don't accidently get the acetate stuck to the image in the wrong place. You should have excess acetate over the cardstock.
11. Trim excess acetate so that it is the same size as the cardstock.
12. Carefully trim off 1/4” from each side of image keeping 1/2” at the bottom. (hint: at 1/4”, trim up to 5” from top- stop at 5").
13. Now, trim off the strips you just cut. You should have a tab at the bottom of the image. Cut off the tab from the ACETATE ONLY. Keep the tab on the cardstock.
If you look closely, you can see that I just cut off the acetate tabs and not the cardstock. If you cut the cardstock tab, your slider will not stay in the card! This photo isn't that good I know... Sorry!
14. Take 1/2” x 3” cardstock and score at 1/4” (in half the long way).
15. Using double stick tape, adhere to the top of the image/acetate piece so that it covers both.
16. Get card cover piece and fold top right panel down, so that there are 2 panels (side by side).
start with this...
end up like this

17. Get the card cover piece and on the left panel, line up stamped image to the bottom of the card. Center image.

18. While holding the image in the center, get the largest oval Spellbinder’s die and center over the stamped image.
19. Carefully remove the image while holding the oval die in place. This is the only way I could figure out how to cut the hole where I wanted it!

20. Cut oval using Sizzix Big Shot Machine. Re- measure to see if you cut it correctly.

21. Adhere white 4” x 5 1/4” cardstock to the back piece (piece w/oval cut from it will go over this piece.

22. Punch a 1/2 circle for the tab at the top of the card cover.

23. Carefully insert the card from the bottom. This photo shows where the slider should go.

There are 2 pockets that you can slip it in– it should go in the back pocket.
26. Pull image up from the top of the card through hole on the top– card should not be able to pull completely out from the pocket.
27. Carefully pull out the acetate sheet only and insert it into the front pocket (where oval window was cut).

28. Test mechanism to see if when you pull out image from top if it appears colored.

29. Punch a hole at the top center and attach ribbon.

30. Fold excess cardstock of card cover over the card so that it closes it in the back. Tape card cover closed. You could score the excess piece at ~ 1/4" but sometimes the cardstock is too thick and it won't close well.
31. Adhere card cover to card base.

32. Your card is almost complete! Just embellish as desired.

I'd love to see what you do with this card! The possibilities are endless! Have fun!